Here’s a step by step guide to installing Python and Django on top of the WAMP stack. I’ve used Windows XP in this example, but there shouldn’t be much difference with Windows 2000, NT, 7, Vista, etc.
If you have any problems (or even if you don’t) don’t hesitate to leave your comments so others might benefit from your experience, good or bad.
1. Install Wampserver
The latest release of WAMP is WampServer 2.1a [24/12/10], and includes:
- Apache 2.2.17
- Php 5.3.3
- Mysql 5.1.53 (version 64 bits)
- Mysql 5.5.8 (version 32 bits)
- PhpMyadmin 3.2.0.1
- SQLBuddy 1.3.2
However, for this example I’m using the previous version of WampServer, 2.0-i [07/11/2009]. It’s unlikely this will cause you any problems. WampServer 2.0-i looks like this:
- Apache 2.2.11
- Php 5.3.0
- Mysql 5.1.36
- PhpMyadmin 3.2.0.1
Once WAMP is installed and running properly, give yourself a pat on the back on move on to step number 2.
2. Install Python
- Download a current production version of Python for Windows. At the time of this writing, Django supports 2.x versions only.
- Install your file (ex: python-2.7.1.msi) to your desired location. For this example, I’ll choose C:Python27
- Test Python’s interactive interpreter. Make sure that your command window recognizes ‘python’ as a command to start the interpreter:
- Open your command window.
- Type the command python and hit enter.
- If things are working as they should, you should see something like:
Python 2.7.1 (r271:86832, Nov 27 2010, 18:30:46) [MSC v.1500 32 bit (Intel)] on win32
Type “help”, “copyright”, “credits” or “license” for more information.
>>>
…and you can proceed to install Django.
If instead you get an error such as:
‘python’ is not recognized as an internal or external command, operable program or batch file.
then you’ll need to add Python’s installation directory path to your command window as an environmental variable. Here’s how it’s done in Windows XP:
- Go to the properties window of ‘My Computer’, and then to the ‘Advanced’ tab
- Click on ‘Environmental variables’ at the bottom of the ‘advanced’ tab.
- If there’s no PATH variable present on the left had side, click ‘new’ and add Path with a corresponding value on the right (in this case, C:Python27). You can choose to do this for either your Windows user account or system (all users). If a PATH variable is present, select it, click ‘edit’ and simply add the C:Python27 path as a variable directly after them, preceded by a semicolon as in fig 1.

Fig. 1 – Add new environmental variable
- Click ‘ok’, and ‘ok’ again to close the ‘system properties’ window.
- Open a new command window, and type python and hit enter again. You should now see the message I mentioned earlier; something similar to:
Python 2.7.1 (r271:86832, Nov 27 2010, 18:30:46) [MSC v.1500 32 bit (Intel)] on win32
Type “help”, “copyright”, “credits” or “license” for more information.
>>>In the unlikely event that you still don’t see this message, it’s time to hit up Google and/or leave a comment at the end of this post.

3. Install the Python WSGI (Web Server Gateway Interface) adapter module for Apache
Mod_wsgi (pronounced as ‘wiz-gee’) is an Apache HTTP Server module that provides a WSGI compliant interface for hosting Python based web applications under Apache.
- Download mod_wsgi for your version of Apache and Python. For this example, I used mod_wsgi-win32-ap22py27-3.3.so since I’m running Apache 2.2 and Python 2.7.
- Rename the downloaded file to mod_wsgi.so and move it to the modules/ folder of your Apache installation in WampServer.
- Add the following to your Apache configuration file (httpd.conf) for Apache to recognize python applications:LoadModule wsgi_module modules/mod_wsgi.so
and, to grant Apache rights to serve scripts from a directory we’ll use for our Django projects:
 <Directory C:/projects/testProject>

Order deny,allow

Allow from all

</Directory>
Restart Apache - Once you’ve got mod_wsgi installed and activated, add the following to your httpd.conf file:
WSGIScriptAlias / "c:/projects/testProject/django.wsgi"
and then, create a file named django.wsgi. To it, add the following:
import os, sys

sys.path.append('c:/projects/') os.environ['DJANGO_SETTINGS_MODULE'] = 'testProject.settings'

import django.core.handlers.wsgi

application = django.core.handlers.wsgi.WSGIHandler()
4. Install Django
- Download Django, and unpack the tarball to any folder. Let’s use C:Documents and SettingsMattMy Documents. Once the tarball is unpacked, you’ll have a folder such as C:Documents and SettingsMattMy DocumentsDjango-1.3 which contain Django’s installation files. Copy this path from the address bar.
- Open a command window and change directory to Django’s installation files folder. In this case you would type cd C:Documents and SettingsMattMy DocumentsDjango-1.3.
- Verify that you see the contents of the folder with the dir command.
- Run the Django setup file by running
python setup.py install - Once the installation is complete, type python and hit enter to get the Python prompt, and then type
import django. Hit enter. - If nothing happens at this point, i.e., no errors appear, Django is successfully installed.
- Let’s test it.
- Create a folder for your various Django projects; say c:/projects/ for example. (Unlike with what you might be used to with PHP, your Python code and Django project files should be outside your Web server’s document root for added security).
- Open your command window and change directories to your c:/projects/ folder.
- Run the command
django-admin.py startproject testProject
to create a subfolder called testProject/ that will automatically contain 4 project files. If you get a command not found type error, it means you’ll need to add the path todjango-admin.pyas an environmental variable to window’s system path, similar to what you might have done when installing Python:- Go to the properties window of ‘My Computer’, and then to the ‘Advanced’ tab.
- Click on ‘Environmental variables’ at the bottom of the ‘advanced’ tab.
- If there’s no PATH variable present on the left hand side, click ‘new’ and add Path with a corresponding value on the right (in this case, C:Python27Scripts). You can choose to do this for either your Windows user account or system (all users). If a PATH variable is present, select it, click ‘edit’ and simply add the C:Python27Scripts path as a variable directly after them, and preceded by a semicolon as in fig 2.
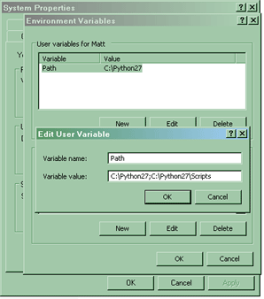
Fig. 2 – Edit environmental variable
- When the command
django-admin.py startproject testProjectcompletes with no errors, you’ll have 4 project files. To verify that this this worked, cd to your c:projects/testProject/ directory and run the commandpython manage.py runserver. You’ll see the following output on the command line:Validating models...0 errors found.Django version 1.0, using settings 'mysite.settings'Development server is running at http://127.0.0.1:8000/Quit the server with CONTROL-C.
This confirms that you’ve started the Django development server, a lightweight Web server written in Python.
When Django’s development server is running, visit http://127.0.0.1:8000/ to see your first Django-powered page. This server is available to you should you prefer to use it over Apache. However, now that you’ve installed mod_wsgi, Django will run from Apache without having to start the development server at all.
Visiting http://127.0.0.1 (no port 8000 specification) will confirm that django is now running on Apache.Since this guide focuses on using Django with WampServer, we’ll need to install the Python MySQL library next.

5. Install the Python MySQL library
The MySQL-Python package allows Python to interface with WampServer’s MySQL database.
- Download the most recent version of MySQL-Python for Windows.
- Run the installer.
- Send thanks to Ioannis Lalopoulos, his MySQL-Python module just saved you from spending a helluva lot of time trying to compile the MySQLdb on Windows.

Sigo todos los pasos pero en caso de copiar el .so a modulesy agregando la linea a httpd.conf después de hacer todo eso no carga el apachecual puede ser el problema
Hola yense,He hecho algunos cambios en la guía. c:/mysite ha sido sustituido con c:/projects/testProject.En su httpd.conf, reemplace el texto siguiente:<directory> Options ExecCGI AddHandler wsgi-script .py Order allow,deny Allow from all </directory>con el código en el paso 3.3y luego vuelva a leer la sección 3.4, ha cambiado.Don’t forget to rename your ‘mysite’ folder to testProject, and add it to c:/projectsNo se olvide de cambiar el nombre de ‘misitio’ carpeta para TestProject, y añade que en c: / proyectosUna vez hecho esto, usted debe conseguir una ‘Se trabajó "en la página cuando vaya a http://127.0.0.1Déjame saber si usted tiene cualquier otra pregunta, lo siento por la confusión!
It appears to work! Thanks for you help. One problem I had initially was that I had cygwin on my path and it contains a version of python. Renamed that and all continued smoothly.
@Beer RecipeThat’s great news!I’ve since moved to Linux, and can tell you firsthand that installing Apache, MySQL, PHP, phpMyAdmin and Django was only a matter of a few lines in the terminal. Python’s already installed in Linux (and MacOS).Are you familiar with Django or brand new?
i cant get apache to run correctly when I put this in the file like stated "WSGIScriptAlias / "c:/projects/testProject/django.wsgi" "
Wow – thank you man! You make it seem so easy 🙂
Hi, i can´t make django running over apache! any ideas?
you rock, thanks